Tuesday 4 January 2011

...my very own light box!

One of the serious bummers about living in a topsy-turvey upside-downy house, which is partly built into the side of a hill and partly built immediately next to a public footpath, is the fact that we get quite a limited supply of natural light. I try to avoid fully opening the blinds at the front of the house for fear of inviting a constant stream of passing glances into my living room from the footpath (its very difficult not to have a sneaky look when you're walking directly in front of someone's home - I do the same myself!) and the light tends to be rubbish from the other side of the house at the times when I am at my most productive! This is not good for taking nice bright pictures of ones creations.

So, up until now, I have been utilising the only naturally bright area in the whole house for photographing my projects - the windowsill in my bedroom. If taken at the right time of day, I found the results could be quite successful, if a bit limited (it was becoming very difficult not to capture the barbed wire fence from our nearby Equestrian Centre in the background to my photos, for example....). However, since I am a full-time working girl, and cannot always guarantee that I will be home in good time to utilise my half hour window of natural sunlight, I decided to look into buying/making my very own light box in which endless brightly-coloured photographs could be taken at all hours of the day and night, whatever the season!

After a very brief bout of internet research, I stumbled upon this very helpful tutorial which provides clear and concise instructions on how to build your own light box from a simple, and easily-sourced, range of materials. And I am very pleased to say that the results are most excellent!

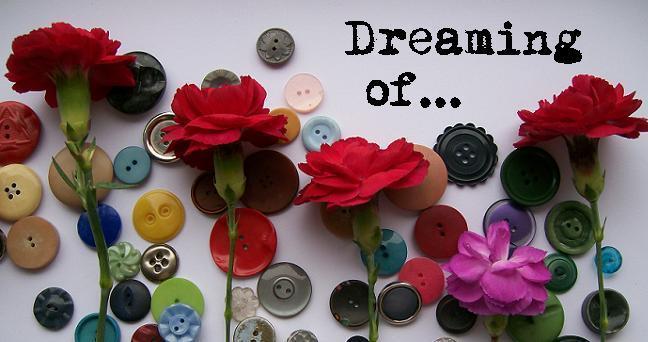
The photos in this post were taken in the light box at 10pm on a winters night and I think, in the circumstances, they look pretty impressive. Since taking these pictures, I have increased my lamp collection threefold, which should hopefully increase the brightness infinitely - but, even with just the one lamp, I am really quite pleased with how they look.

If anyone has any additional tips for photographing work, especially small projects like these, I'd love to hear them!

Kat

X x

Friday 12 November 2010

...new arrivals!

I dare not even try to work out just how long it has been since my last post......I suspect that many weeks (and possibly even months - eeek!) may have passed.

However, one of my New Year resolutions (not that I believe in such things, of course) is to think less and do more so, without further pause for thought or regret, I shall move swiftly on!

The last few months have been a time of extreme excitement in my household as we have had a little addition to our small-but-perfectly-formed family of two - no, not the traditional pitter patter of tiny baby feet but rather the mad scrambling of furry paws. That's right, we have adopted our very own cat, Derrick Bostrom! Now I appreciate that this is possibly the most ridiculous name ever to be given to a cat, and indeed it attracted a few raised eyebrows at the Vets, especially when Mr Kat insisted that both names be added to his record (in addition to my surname!) when the poor blighter was chipped. However, the original Derrick Bostrom is a very popular drummer in our household and Mr Kat saw this as the perfect opportunity to make the ultimate accolade to one of his musical heroes. Personally, I think its ridiculous and try to refrain from using his full name wherever possible - Dez Boz suits me just fine.

So here we are, my new furry baby.........

And what a handsome devil he is.

In other (more creative) news, I have been hard at work trying to develop some new ideas for a jewellery/accessories range that I want to bring out later this year - hopefully with a view to finally setting up my very own stall at a local craft fair, something which I have talked about for many years but which I have never quite gotten around to. I find it quite daunting to think about just how much stock I would need to make to fill even the most humble of trestle tables and have always just settled for making things for friends or for sale on E Bay. However, it is my most sincere intention that 2011 will be the year when I finally grab the bull by the horns and try to carve myself a place in the local craft community!!

I have also been working on various functional items for around the home, including this curtain for my boiler cupboard:-


(with bonus Dez Boz...)

And these cushions for...well, anywhere really:-


Here's to 2011, a year full of promise, intrigue and (fingers crossed!) fulfilled resolutions!

Happy New Year one and all!

Kat

X x

Saturday 21 August 2010

...recycled buttons

This is something I have been meaning to post about for a while now and, after a manic few weeks of home renovations (photos to follow as soon as I've wiped the sawdust and polyfilla from my camera lens!), I am finally able to do so.

From a crafting point of view, these button rings were quite possibly the simplest project I have undertaken for some time. A handful of vintage buttons, a few ring mounts and a good tube of superglue and hey presto! That said, I have definitely come to realise the importance of good preparation when it comes to bonding plastic and metal together with superglue - its quite a brittle thing, superglue, and some of my efforts were quite short-lived as a result. However, after a bit of sanding & "roughing up" and a more specialist glue (this one comes highly recommended), I think this is a rather thrifty and effective way of expanding ones jewellery collection!

Kat

X

...more fabric jewellery

I would love to tell you that the past 19 days have been spent in some kind of Jelly Roll frenzy, which has rendered me completely incapable of updating my posts; that my every waking hour has been spent knee deep in gorgeous strips of fabric and that I have created a mountain of spectacular new items to dazzle you all with. This, sadly, would be a lie. Yes, there have been moments of extreme fabric joy and, yes, I have had a brrrrilliant time playing with my new stash and coming up with some new ideas to inspire my ever-growing fabric jewellery obsession. However, there have also been moments of extreme laziness where I could quite easily have turned on the computer and put some of my exploits down in writing…..but didn’t. How do people do it! Routine is key, I feel.

So, whilst I go away to consider the best way for me to get my Blogging Groove on, I shall leave you all with some pictures of the little pretties that I have been crafting out of the majestic Jelly Roll. And, honestly, I haven’t even scratched the surface of it yet!!

The first items I came up with were these hair barrettes, which I made out of a very sweet brown and pastel fabric. I really love the five-pointed flower with the lime green button – don’t know if I can quite pull this off myself, being 28-years old woman and all. But I know my 8-year old self would have loved something like this. The Suffolk-puff barrette also worked quite well, I think, but maybe a bolder fabric would have worked better with such a small-scale item.


I think these next items might be my favourite. The red dotty fabric is just so pretty and works really well with the rose design. And I think it definitely makes the difference using a bolder/more detailed fabric for the small suffolk-puff ring.

And last but by no means least, these little lovelies:-

I am in two minds about the barrette – one part of me thinks it might be a bit too “squished together”, having the two roses side by side like that, but, as time goes on, it is starting to grow on me a bit. I really love the rose ring but would possibly use a lighter fabric next time so the folds are a bit more obvious – I want it to look like a rose, not just a random bundled-up piece of fabric!

Maybe one day I will make a whole batch of these sorts of things and endeavour to sell them on my very own craft stall somewhere – I can just picture them scattered across a trestle table and heaped into big decorative bowls for people to rifle through. I would love to see what people really think of my humble creations and whether anyone would part with their hard-earned pennies for them. Obviously, it’s always lovely to get positive feedback from friends and family but it must be utterly brilliant to know that someone is willing to buy something that you have made with your own fair hands – the real acid test!

X

...Jelly Rolls!

For anyone who goes slightly weak at the knees at the sight of a beautifully presented bundle of fabric...get a load of this!!

This, my friends, is what is known as a "jelly roll". How lush does that sound? Perhaps there are other, more enlightened, souls out there who are already perfectly well acquainted with this lovely term, but I wouldn't have known my "jelly rolls" from my "arctic rolls" until just a few days ago.

I decided that, before investing in a new stock of fabric for my ever-growing collection, I would purchase a collection of various different samples and choose my favourites from there. After spending some considerable time perusing this most brilliant website, I decided to plump for one of Beyond Fabric's Moda Jelly Rolls. And boy did I make the right choice!

As you can see from these pictures, there were easily 30 or 40 different types of fabric folded together, in ridiculously beautiful colour-co-ordinated sections, within the one Roll. Quite how this was done, I will probably never know - it was just too pretty for words.


I could barely bring myself to undo the ribbon and destroy the gorgeousness, but when I finally did begin to unravel the Roll (after taking many many "before" photos), I couldn't believe just how many beautiful strips of fabric were waiting patiently inside! It was like the Mary Poppins handbag of fabric bundles!

And, for those of you who might have been wondering, here's what it looked like from above. Awesome....just awesome.


So now I must delve deep into my vast and varied collection of new fabric samples and create something which will do them justice!

This is going to be fun.......

X x x x

P.s. Not quite sure why my first photo has such a pinky sunset hue to it - must have been my rose-tinted glasses! X

Monday 2 August 2010

...wonderful birthday surprises!


It was my 28th birthday recently and it delivered not one but two wonderful surprises, which I have been able to cleverly display for you in this one post.

The first was a beeeeeeee-eautiful bunch of long-stem white roses, which a darling gorgeous friend of mine had arranged to be delivered to my office from her hospital bed. The roses were hand-delivered by said friend's sister, who also came bearing a slice of M&S Victoria sponge cake! Really - is there a more perfect package of goodies to receive on a birthday when you're stuck at work? And all from a lady with many more things to be thinking about than ensuring I have something to pretty to look at on my birthday. But then I guess there are just some people who will always manage to brighten up your day and put a big smile on your face, irrespective of the other trials and challenges that they might be going through at that particular time. A sign of true character, if ever there was one.


My second surprise gift of the day was from Mr Kat, who bought me a brand new Canon Ixus 130 camera. I wasn't even aware that there was anything wrong with my current camera until I gave my new one a whirl and, well, I think these photos probably speak for themselves. Its a true piece of camera wizardry if ever I saw it and it makes it virtually impossible to take a bad photo!! Which is nice.

Kat

X

...my wedding clutch!

So here it is, some four weeks after my last post (eeek!)......

......my long-awaited wedding clutch bag!

[Hurrah! Fanfare! Cartwheeling giraffes etc etc.]

I'm very pleased to say that the final version of my clutch came together almost exactly as hoped (which hardly ever happens for me!) and I was over the moon with the end result. The gorgeous Amy Butler fabric worked so much better with my purple dress than I even imagined and the 5 hours spent stitching individual seed beads and sequins to the front panel really paid off I think.


The only last-minute change which I needed to make was the addition of a pearl necklace as tuckable-inable strap - very important for freeing up one's arms for photo-taking and disco duties!


As mentioned in one of my earlier posts, I also very sensibly decided to ditch the velcro strip in favour of a much more appropriate and discreet magnetic clasp (see below).


All in all, a triumph! I suspect this may be a pattern which I will be re-visiting again in the future.


And as for the wedding itself, it was just lovely; everything that a good wedding (in my humble opinion) should be - relaxed, fuss-free and very very smiley, with the obligatory sprinkling of inebriated guests stumbling around on the dance floor under the apparent misapprehension that they are Beyonce/Justin Timberlake/Michael Flatley! Perfick!

X